There is no greater glory for flour and yeast than to metamorphose into pizza dough. Yet, hard as we try, it’s difficult to capture the flavor and chew of pizzeria crust at home. What’s the secret?
If you ask Christopher Kimball, he’d say the secret ingredient in great pizza dough isn’t an ingredient at all: it’s temperature. Just before baking, bring the dough to 75°F, and it will puff up and give you a lovely crust.*
In Naples, though, they would offer another, more powerful secret ingredient that’s also not an ingredient: a wood fire.
A wood-fired oven radiates the heat of Hades for a quick, dramatic rise. The crust gets crisp on the bottom yet puffs up elsewhere, with characteristic dots of char. During all this, the flaming wood and glowing embers season the pizza with a subtle smoky flavor. You can approximate this flavor by cooking pizza on an outdoor grill, but can’t get close in a kitchen oven.
Dan’s brother John built a wood-fired oven a few years ago, and just the idea of a home pizzeria convinced Dan to follow suit. His backbreaking work and Italian sensibilities created a pizza altar that united our two, deep-seated primal urges: his to cook with fire, mine to bake bread.
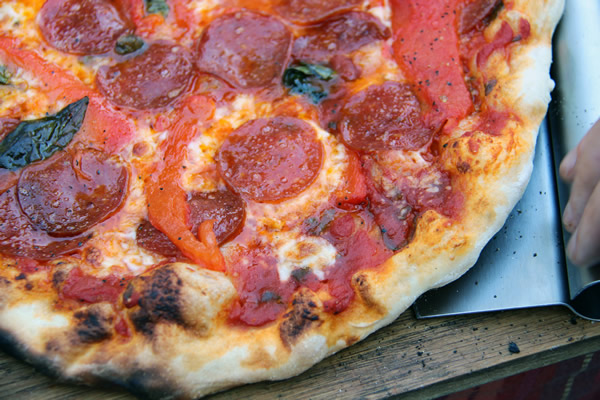
As Dan became master of the flames and red sauce, I obsessed over dough balls. My goal was a strong, thin crust that would puff up with lovely bubbles around the edge and have a nice chew. I tried and tweaked many recipes, settling on an adaptation of the Olive Oil Dough from The New Artisan Bread in 5 Minutes a Day. Turns out it’s a close cousin of my previous go-to pizza dough, Mollie Katzen’s Basic Yeasted Flatbread.
Now, this is not a Neapolitan dough, which is made of Italian 00 flour and contains no oil. I use bread flour because, like 00 flour, it’s rich in gluten and renders a puffy, somewhat chewy crust. Adding oil makes the dough easier to handle. Many say olive oil improves the taste and tenderness, but for me, that claim would be a stretch (pardon the pun). You may be tempted to use all olive oil, but I found that the dough seems to bake higher with half canola/half olive oil. There is absolutely no science behind it, but I’m happy with the result.
I also fell for the pizzeria bakers’ claim that diastatic malt powder is the secret to a strong rise and browning. They say it’s better than sugar for feeding yeast during long refrigerator fermentation. I found this to be true for Star Bread, where the smooth crust reaches a rich golden brown. While it’s harder to tell with pizza, I still keep a jar of diastatic malt powder in the freezer right next to the yeast, ready for the next batch of dough.
As for baking temperature, Dan seeks a sweet spot between 700° and 800°F for the oven floor, coincidentally the same range as specified for Neapolitan pizza. We had thought the Neapolitan required the often-quoted 905°F (485°C), but it turns out that refers to the oven’s ceiling, not the floor. At the lower end of the temperature range, our pizzas bake a little longer than the official 60-90 seconds and are less likely to flash into charcoal.
If you’re going to make pizza, make enough for a party. This recipe yields five pies, but I also list the ingredient amounts per pizza in case you want to scale up or down. You can always freeze leftover dough, or refrigerate it to make flatbread within a few days.
Our dough’s key ingredient is the wood fire. But don’t despair if you don’t have this ingredient; the dough will still work nicely on a pizza stone, grill, or however you make your pizza. As the meme goes, “You can’t make everyone happy. You’re not pizza.” However, with this dough, you can give it a try.
Neo-Neapolitan Pizza Dough
Makes 5 large pizzas, about 11 ounces of dough each, about 13 inches in diameter
- 6½ cups bread flour (1.3 cups per pizza)
- 1 tablespoon SAF instant yeast (about ½ teaspoon per pizza) (.6 actual)
- 1 tablespoon kosher salt (about ½ teaspoon per pizza) (.6 actual)
- 2½ teaspoons diastatic malt powder (½ teaspoon per pizza) (Available from King Arthur Baking)
- 2 tablespoons olive oil (about 1¼ teaspoons per pizza)
- 2 tablespoons canola oil (about 1¼ teaspoons per pizza)
- 2¾ cups water, cold if mixing with a machine, lukewarm if mixing by hand (.55 cup per pizza)
- Mix dough using one of these methods.
1a. With stand mixer:
Mix flour, yeast, salt, and malt powder in the mixer bowl with paddle. Add oil, then pour in water. Mix a little more, then switch to the dough hook to knead until the dough is stretchy, a little like the consistency of bubble gum. Add a bit of flour if needed to free the dough from the hook.
1b. With food processor (recommended for small batches):
Whir all ingredients for a couple of minutes until the dough is stretchy, a little like the consistency of bubble gum.
1c. By hand:
Use a wooden spoon or (preferably) a dough whisk to thoroughly combine. Stir well until very stretchy, but do not knead. You may need to use wet hands to mix in all the flour. Dough will be a little sticky. - Dough should be very stretchy, but still workable as dough. If too wet, add a little extra flour. Divide dough in half and transfer to two large oiled bowls, oil tops, and cover with plastic wrap. (For smaller batches, one bowl will do.) Let rise 2 hours, until dough rises and collapses. Refrigerate for a day or more, covered thoroughly with plastic wrap.
- Two hours before baking, dust the surface of the dough with flour and cut into 5 pieces. Dust each piece with flour and shape into balls by stretching the surface of the dough and tucking in at the bottom, rotating as you go. Let sit on a floured cookie sheet for at least an hour, preferably two, covered with plastic wrap on a well-floured baking sheet. I find the balls can sit out another hour or so, as you make the pizzas, and they just get airier and perhaps even better. (Remember that Christopher Kimball says the dough should get to 75°F.*)
- Gently move the relaxed, airy dough ball to a floured counter. Use your fingers to deflate the center portion of the soft disk to enlarge the round to about 6 inches. Don’t deflate the outer edge to keep the rim puffy. (That higher outer rim is called the cornicione, important in Neopolitan pizza.) Turn dough over. Protecting that higher rim, press down the rest of the dough, rotating and stretching it, until the whole crust reaches about a 13-inch diameter.**
- Sprinkle flour onto a wooden pizza peel. Transfer dough to the peel, and work quickly to top the pizza, shaking the peel on occasion to make sure the dough won’t stick. For the classic Pizza Margherita, cover lightly with sauce up to the edge, and then add lumps of whole milk mozzarella, grated parmesan and/or romano, and basil leaves, and lastly drizzle with olive oil. Bake in the prepared oven until bubbly and browned, and remove with a metal peel.
Of course, have fun with your favorite toppings, but be careful not to overload the pizza. The bread is the delicious prize. - Refrigerate any remaining dough, tucking in plastic wrap around the dough to keep skin from forming. Use within a week or freeze.
*Milk Street’s recipe calls for warming the dough after refrigeration by putting balls into small lightly-oiled bowls, covering them with plastic wrap, and placing them in a larger bowl with 100°F water for 30 minutes, changing water as needed until the dough reaches 75°. I have not tried this. Our recipe’s longer proofing before baking allows the dough to warm to ambient temperature, usually high enough in the summer. I suppose you could also warm the dough using a proofing setting on a kitchen oven, which is 100°.
** See Vito Iacopelli’s technique for stretching pizza.