In his final “Kitchen Detective” newspaper column, Christopher Kimball signed off with some advice. He said that once you find a recipe that makes you happy, just stick with it. Don’t waste your time chasing down perfection. This sounded odd coming from a guy who built an empire on his own obsession with finding “The Best Recipes.” But even he could admit that, as the saying goes, better is the enemy of good.
Since whole wheat sandwich bread is a character actor in a supporting role, a good loaf can range from dense to airy, dark to light, sweet to slightly bitter. There are plenty of recipes kicking around, and if you’ve found one that makes you happy, you’re all set.
I tried a few, but never landed on a recipe that pleased me enough to put it into my repertoire. So I just gave up. A couple of years ago my daughter Claire sent me this Honey Whole Wheat Bread recipe with her assurances that it is both tasty and easy to make.
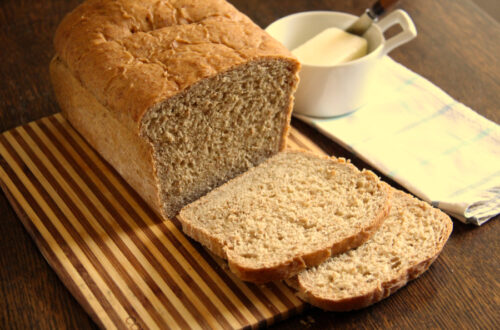
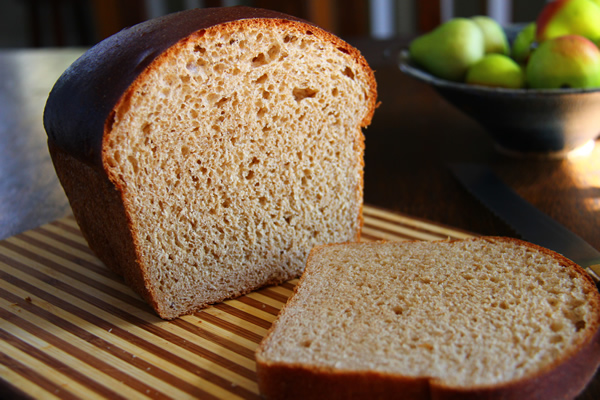
And of course, being my fabulous daughter, she was right. This taste-tested recipe yields one magnificent bakery-sized loaf that crests well over the top of a 9×5 pan. It’s astonishingly airy, delicately nutty, and bright with honey. It doesn’t crumble when cut, and a slice fits your toaster slot nicely.
Claire mixes and hand-kneads this in the same bowl, cleverly reducing mess and helping to keep the dough tacky. I used to enjoy kneading, but several years ago I discovered that I could approximate my zen-like “breaditation” by watching the dough whir in a food processor. It did well—until I burned out the motor. So after years of stubborn resistance, I finally got a heavy-duty stand mixer said to “aid” in the “kitchen.” (Bread-baking guru Dan Friedman advised me on the best model.) It works the slightly sticky dough without extra flour, stretching those gluten strands into something akin to bubble gum for optimum rise.
This is Claire’s ingredient list, but I’ve taken some liberties with the methods, hoping she doesn’t mind. First, I don’t dissolve yeast in water, since I use the instant kind designed to go in with dry ingredients. I sometimes let the dough rise in the fridge overnight, ready to bake any time the next day. Some say this cold fermentation may also enhance the flavor. (Unlike cold fusion, it’s useful.) You can choose which rising method you prefer, and please let me know what you think.
Does this recipephany make me happy? Yes indeed. So I’m sticking with it.
Claire’s Honey Wheat Bread
Makes 1 lofty 9×5 inch loaf or two 8″ x 4″ x 2 1/2″ loaves. Doubles well.

- 2 1/2 cups bread flour (approximately, added in stages)
- 1 (.25 ounce) package rapid rise yeast (2 ½ teaspoons of SAF-Instant)
- 3/4 cup water
- 3/4 cup milk, room temperature
- 2 tablespoons canola or vegetable oil (measure before the honey so the honey won’t stick to the spoon)
- 3 tablespoons honey
- 1 1/2 teaspoons table salt
- 2 cups whole wheat flour
- Butter for glazing (optional)
Put 1 1/2 cups of the bread flour into the bowl of a stand mixer with a paddle attachment, or the bowl of a powerful food processor with a metal blade. Add yeast, water, milk, oil, honey, and salt, and blend for half a minute or so. Add all the whole wheat flour and mix again until blended. Add the remaining bread flour, 1/2 cup at a time, and knead (change to dough hook in the stand mixer) until it is soft, smooth, tacky and stretchy. Add some drops of water if dough is dry, a bit hard, and not getting stretchy, or add a dusting of bread flour if the dough is sticking too much. In a food processor, kneading might take 3 or 4 minutes, but watch that dough doesn’t overheat. A stand mixer might take 8 minutes or more. There may be some bread flour left over. If you use all the flour, you may find that you need to add more water to keep it stretchy. Finish with one of the rising/baking instructions below.
Note: If you prefer the exercise, do what Claire does and mix ingredients in a large bowl and then knead by hand right in that bowl (simply brilliant!) for about 10 minutes.
Place dough in a lightly oiled bowl and turn it to grease the top. Cover bowl with plastic wrap and let rise in a warm place until doubled in volume, about 2 hours.
Lightly grease a 9×5 inch loaf pan. Punch the dough down and turn onto a lightly floured surface. Form dough into a loaf and place into the prepared pan. Cover with plastic wrap dusted with flour to keep it from sticking and let rise in a warm place until doubled in size, about 45 minutes.
Preheat oven to 375° F (190°C). Bake for 35 minutes or until top is golden brown and the bottom of the loaf sounds hollow when tapped. Remove loaf from the pan and spread a pat of butter on top to glaze and soften the crust. Cool on a wire rack.
Refrigerator Rise (Cold Fermentation)
Place dough in a lightly oiled bowl and turn it to grease the top. Cover bowl with plastic wrap and let the dough rest for 20 minutes.
Lightly grease a 9×5 inch loaf pan. Turn the dough out onto a lightly floured surface. Flatten dough into a rectangle about as long as the pan and slightly less than twice the width. Roll up like a jelly roll and turn edges under to form a taut loaf and place into the prepared pan. Brush the top lightly with oil and cover with plastic wrap. Refrigerate 2 to 24 hours. (I like to make the dough and form the loaf after dinner and bake in the early morning.)
When ready to bake, preheat oven to 375° F (190°C). Remove pan from the refrigerator and uncover dough carefully. Puncture any large gas bubbles that may have formed using a greased metal cake tester or toothpick. Allow to stand at room temperature for 10 minutes, or as long as it takes to preheat the oven.
Bake 35 minutes or until top is golden brown and the bottom of the loaf sounds hollow when tapped. Remove loaf from the pan and spread a pat of butter on top to glaze and soften the crust. Cool on a wire rack.